

I have at last had some time to play with knitr, which an R-project package written by Yihui Xie in order to correct some shortcomings of Sweave. knitr is really much more convenient than Sweave and it integrates beautifully with Lyx (there is a module for knitr in recent versions of Lyx), ggplot and tikzdevice in R.
Rstudio, the very nice IDE for R-project also understands knitr out of the box. In this case, you also get and easy way of writing web pages containing results from R-project, since you can use Latex of Markdown for composing these pages and/or documenting your research.
If you frequently update a regularly published report that uses data and statistics, you have a perfect setup in this framework (I am not in this case).
Knitr's web page is: http://yihui.name/knitr/
Complementary information and manuals can be downloaded from its GitHub page: https://github.com/yihui/knitr.
If you like Latex/Html and R-project, you should definitely check it.
Sunday, May 05, 2013
Wednesday, October 24, 2012
Using Hazel for the automatization of the conversion: Markdown -> Latex -> PDF
Using Hazel for the automation of the conversion: Markdown -> Latex -> PDF
As I have explained in my last posts, I am trying to craft a writing chain that would allow me to write in Markdown and easily convert this readable text to Latex and PDF. I can even download the final PDF file on my iPAD using a Dropbox folder.
Hazel is a very nice automatization system that I was planning to explore more in details, and it indeed solves a lot of problems in this case.
My chain works as the following (this completes my previous message):
- I write my text in IAWrite (under OSX or iOS) and they get saved in the iCloud (suppose that the file is called mytext.md).
- On the desktop, these files appear in the mobile documents folder (~/Library/Mobile Documents/74ZAFF46HB~jp~informationarchitects~Writer/Documents). I use a first Hazel script (see Figure 1), attached to this folder, for copying this file to a Dropbox folder, as soon as a new version is saved.

Fig. 1: Copying the .md file - When the .md file is copied, other Hazel scripts, attached to the destination Dropbox folder, start to play.
- One script converts the file to .html and .opml formats. This script calls multimarkdown for converting the copied markdown file to these formats (see Figures 2–3).

Fig 2: Running the script for converting to HTML and OPML

Fig 3: The script for calling multimarkdown - Another script (see Figures 4–5) converts the file to Latex format (only if the md file contains the meta tags that are necessary for obtaining a complete Latex file at the end of the conversion – otherwise Multimarkdown converts Latex snippets that cannot be compiled by Latex).

Fig 4: Calling the script for converting to Latex 
Fig 5: The script that calls multimarkdown - A last script (see Figure 6) converts the Latex file obtained in the previous step to PDF, using latexmake. Latexmake is a Perl script that automatically runs the necessary operations for converting your tex file to PDF (the final format I have chosen here). Moreover, I have discovered that multimarkdown is not able to correctly convert accented characters in the meta tag fields. So, I have problems if the title, for example, is in French. For correctly converting these Unitype characters, one needs to compile the document using xelatex, and not pdflatex. The full Bash script I use can be downloaded below (including some commented instructions that was useful for debugging it, and that could be useful in some other contexts).

Fig 6: Calling the script that runs latexmake
Download the scriptMonday, October 22, 2012
Using Marked for previewing and exporting Markdown text
So, I am learning Markdown using iAWriter and I have discovered a very nice tool for previewing my text as it will be typeset, once converted: Marked. Marked uses MathJax for previewing even your equations, written following the standard proposed by Multimarkdown.
Using markdown as a lightweight LateX editing support on iPad and iCloud
I have been looking at the ways of editing LateX files on the iPad. There are already interesting LateX editor (TexTouch, TexWriter etc.), but I find them quite heavy to use yet, and Latex files are not very nice to decode on the small screen.
Markdown is a much simpler and readable tagging language invented by John Gruber (aka Daring Fireball). I have been tempted to play with it several times in the past, without really getting there. My preferred Latex editor is Lyx now, but we are really not ready to get an iPad version of this very nice editor. So Markdown has seemed as an interesting possibility to explore for writing Latex in a nice editor as iAWriter. Since MultimarkDown offers quite efficient translation of Markdown to Latex (including the equations and figures), as week as other formats like HTML and OPML (useful for importing in Freemind).
Here is my automatic setup for this workflow
Now I can edit my documents on the iPad or on the MacBook using iAWriter and they get automatically synched and converted. If my MacBook is on, I can even get back the compiled PDF back on the iPad, using a Dropbox access (through GoodReader, for example).
I can give more details for this process if you ask for it in the comments.
Markdown is a much simpler and readable tagging language invented by John Gruber (aka Daring Fireball). I have been tempted to play with it several times in the past, without really getting there. My preferred Latex editor is Lyx now, but we are really not ready to get an iPad version of this very nice editor. So Markdown has seemed as an interesting possibility to explore for writing Latex in a nice editor as iAWriter. Since MultimarkDown offers quite efficient translation of Markdown to Latex (including the equations and figures), as week as other formats like HTML and OPML (useful for importing in Freemind).
Here is my automatic setup for this workflow
- synchronizing iAWriter documents between the iPad and my laptop using iCloud;
- copying the file from the iCloud folder (~/Library/Mobile Documents/74ZAFF46HB~jp~informationarchitects~Writer/Documents) to a Dropbox folder each time it has been updated (with Hazel);
- converting the .md file in the Dropbox folder to Latex, HTML and OPML using Multimarkdown in Hazel, a soon as a new version if copied there;
- converting the Latex to pdf using by running pdflatex+bibtex+pdflatex twice).
Now I can edit my documents on the iPad or on the MacBook using iAWriter and they get automatically synched and converted. If my MacBook is on, I can even get back the compiled PDF back on the iPad, using a Dropbox access (through GoodReader, for example).
I can give more details for this process if you ask for it in the comments.
Saturday, May 12, 2012
Top 20 journals in economics, counted by Google, following their h-index of the last 5 years
Google scholar also does bibliometrics now, on researchers (you can easily get your personal Google Scholar page, with all your references and citations indexed by Google), but also now on journals, even in several different languages. The following link will, for example give top 20 journals containing the word "econ" in their titles:
Monday, January 16, 2012
Using multiple processor cores in R-Projet
My laptop is equipped with a Core i7 processor with 4 cores that can execute in parallel 8 processes. My R-Project computations use only one single core, if I use the default instructions. I have ended up by thinking that it is a pity that other cores are just sitting idle (sort of), instead of contributing to the speed of my computations, even if I do not run yet really heavy ones in my research. As a consequence, I have started to look for an easy way to use all cores in R-project. And, indeed, there is an easy solution to this problem. It uses the doMC library, and the instructions foreach and %dopar%.
For example, for computing linear models with different dependent variables and a given set of exogenous ones, one can do the following computations:
library(doMC) # There are other parallel computing libraries
registerDoMC() # You mud register one of them for foreach
getDoParWorkers() # Indicates you how many cores have been detected by registerDoMC()
Suppose that you have a dataset called mydata, containing the dependent variables y1, y2, y3, and the independent variables, x1,x2,x3.
We can execute in parallel the estimation of linear models of each y on the set of independent variables, by executing the following code:
myVariableList <- c("y1", "y2", "y3")
results <- foreach(i = 1:length(myVariableList),.errorhandling="stop",.inorder=TRUE)
%dopar% {
model <- lm(as.formula(paste(myVariableList[i],"~x1+x2+x3")),data=mydata)
return(model)
}
%dopar% executes these estimations on different cores, in parallel and a list of the estimated models is saved in the variable results.We can now look at the characteristics of the estimated models, by printing them successively on the output of R:
for (i in 1:length(results)) { print(summary(results[[i]])) }
Voilà!
Of course, this possibility is especially useful for more complex computations, like stepwise regressions with many independent variables, that can take some time, or regression trees with big datasets, etc.
Saturday, January 07, 2012
Broken XQuartz applications under OSX Lion
So, my new laptop runs OSX Lion. I have been able to migrate my data from the old laptop (but the automatic process provided by the Migration assistant was a failure, Apple support had to help me to do it manually).
Many of the migrated applications have worked without a hitch as soon as the migration ended, but some other applications, like gretl -the GNU econometric software- and some wine-based windows tools, have refused to start. I was quite annoyed by this, but have not had any time to take care of it until today. I have installed wine using MacPorts (instead of the WineBottler that I normally use), the problem persisted. I have discovered PlayItOnMac (PION) implementation of Wine and installed it, but the installation stalled during the creation of the virtual disk needed by this soft.
Now, the support page of PION tells that you should start XQuartz to complete the installation process if you get stalled the first time. And I have tried to do launch it (it lives in Applications/Utilities), but it crashed by telling that the version I am trying to launch is maybe not compatible with my OS. Actually, that was an important clue. I have directly jumped on the XQuartz website and seen that there was a new version waiting for me. I have installed it and BINGO! All my Wine and X11 softs are working again.
So, if you have difficulties to launch Wine-based or XWindows softs after having upgraded to Lion (or on your new Mac under Lion), you should download and install the most recent version of XQuartz, from their web site.
Friday, December 30, 2011
Graphical interfaces (apps) for launching ipe7 and batch converting drawings from ipe6 to ipe7
As promised below, I propose here some small graphical interfaces created with Platypus for:
- Launching ipe. ipe7.app can be launched to open pdf/eps/ipe files created with ipe7. It contains the necessary environment variables (pointing to the standard TeX pdflatex path under TexLive - /usr/texbin/pdflatex) to allow the compilation of Latex text snippets. You can also associate .ipe files with this app and directly open them from finder. You can also right-click on an ipe7 pdf/eps file and « open with » this app.
- Batch converting ipe6 files. ipe6to7-BatchConvert.app will open a small dropping windows on which you can … drop pdf/eps files created by ipe6. For each dropped file, it will save in the same folder as the dropped files two files with the same name as the dropped file (lets assume, filename.pdf), but different extensions: filename.xml is the extracted file;,you do not really need it and delete it if you desire; filename.ipe is the one you want. You can open it in ipe (using ipe7.app, for example ;-) ).
- Converting and opening a single ipe6 file. ipe6to7-ConvertOpen.app will also open a dropping window where you will be able to drop a single ipe6 file (pdf or eps). The app will create the corresponding .xml and .ipe files in the same folder as the original file, and directly open the .ipe file in ipe7 for editing.
Note: These tools assume that you have installed on your Mac OSX:
- ipe7 and ipe-tools using MacPorts (please see below my post on this installation process);
- TexLive (a recent version, I use 2011).
Using Penn World Tables with R-Project, the easy way
Penn World Tables (PWT) is a very nice data collection on economic growth. It covers a large set of countries (from their web site):
« The Penn World Table provides purchasing power parity and national income accounts converted to international prices for 189 countries/territories for some or all of the years 1950-2009. The European Union or the OECD provide more detailed purchasing power and real product estimates for their countries and the World Bank makes current price estimates for most PWT countries at the GDP level. »
|
I use these data for creating graphics for my economic growth course. My workflow was based on importing them in csv format into R-Project. But I have very recently discovered that there is much better way of using them ;-) Just loading the pwt library in your R-project code, thanks to Achim Zeileis, Guan Yang who provide this library. You must first install it from CRAN, using the usual R command for this. Once it is installed, it is enough to run the following commands to gain access to the data contained in PWT 7:
library(pwt)
data(pwt7.0)
You can check the names of the included variables:
names(pwt7.0)
And the help of the package gives you the exact definition of these variables:
help("pwt7.0")
If you prefer, you can use a more user-friendly name for this table:
myData <- pwt7.0
And clean the row names:
row.names(total) <- NULL
And voilà!
Simple and easy, thanks to Achim and Guan :-)
Installing ipe 7 under OSX Lion
After having tried other solutions for my pdflatex graphics, I am reconsidering again ipe (see below my post about this very nice and useful program that allows you to put latex instructions in your drawings). My initial wanderings were motivated by the unavailability of a reliable ipe version under Snow Leopard. I have been able to compile a 6pre28 version (see below), but it was nor as reliable as I desired and it became completely unusable as soon as I have switched to Lion (mainly because of the Qt framework version I have used to compile it). I have also played with versions available in MacPorts and this is the solution I will propose to you for installing ipe7 under Lion.
Before starting: You will need to install XCode from the Mac AppStore and Commandline Tools for Xcode from the Apple developers website (you must register, but the registration is free and you can use your normal Apple/iTunes identity).
A/ Installing MacPorts. First of all, you must download and install MacPorts. It could look daunting at a first look, but the process is quite painless (if you already have MacPorts on your Mac, go to the step B below):
- You first download the dmg archive corresponding to your system (Lion for me) from the install page of Macports;
- Double-click on the downloaded MacPorts-2.0.3-10.7-Lion.dmg file to mount it in Finder and open it in the finder (I assume that you know how to use a dmg file);
- Switch in Finder to the folder corresponding to the dmg volume and double-click on c to launch the installer. You follow the instructions (they are very straightforward). MacPorts installs itself, by default, in /opt/local folder on your system hard disk.
- Once the installation finishes, restart your Mac to be sure that everything (PATH and all will be correctly fixed).
- When your system is back, open a Terminal session and type: « sudo port selfupdate » to update the repository of your macport installation with the list of the most recent packages (you will have to type your administrative password for this).
- You can check the availability of ipe, by typing « port search ipe »;
- You will get the list of all packages that have « ipe » as a part of their name. The two packages that interest us are: ipe @7.0.14 (graphics) (The Ipe extensible drawing editor, the main program) and ipe-tools @20110916 (graphics) (Tools for the Ipe extensible drawing editor, utility tools for converting old ipe drawings to ipe7 - see below about this point).
- You install them by typing in the Terminal:
- sudo port install ipe
- sudo port install ipe-tools
- The installation process will download other all necessary MacPorts packages, and it will take some time depending on the sped of your internet connection and of your Mac. If ever the process stop, you just relaunch the installation instruction. MacPorts will in general give you tips for solving the problem, if you meet any (generally it just works, you must be patient, that’s all).
- You will have a bunch of command in the /opt/local/bin folder now, and the ones which interest us are:
- ipe (the main program, ipe7);
- ipeextract (the utility for extracting ipe instruction from ipe created PDF or EPS files -> ipeextract myfile.pdf gives myfile.xml as output);
- ipe6upgrade (the utility for upgrading ipe6 drawings to ipe7 format -> ipe6upgrade myfile.xml gives myfile.ipe as output);
- These programs are supposed to be launched in the Terminal, but I have created solution for launching them from the Applications menu (using Platypus - see below; I will do another post on this point).
- MacPorts will also install a MacPorts menu in your Applications menu. There will even be an « ipe » item in this menu and it will launch the program. You will be able to draw with it, but, since it does not correctly import the environment variables, you will not be able to run Latex from it. Everything works better if you launch ipe from the command line (or if you use the utilities I have developed using Platypus).
- Now you have a working version of ipe7 on your Mac. Have fun!
Monday, August 15, 2011
Switching to GooglePlus
Posterous does not accept autoposts by mail from/to GooglePlus, so some of my articles can now only be seen on my G+ page.
Moreover, given the complexity of managing Facebook, Twitter, a blog (Posterous was a potential solution for merging these streams) and now G+, I will progressively group everything in the latter stream.
You can read my Google+ stream from this address: My GooglePlus.
My Posterous: http://yildizoglu.posterous.com
Thursday, February 24, 2011
A very nice free tool for OSX: Platypus helps you to make your scripts more user-friendly

I have just discovered a very nice tool. I was looking for a solution that would allow me to include software installed via MacPorts in my Applications menu. I was looking for more than a simple symbolic link to a bash script. Something nicer, with an icon and some interactivity. Then I have found a reference to Platypus on a forum.
Platypus allows you to pack any command-line based software into an .app bundle with a nice icon, or a droplet on which you can "drop" a set of files for batch processing.
You can bundle many different programs as an App: your scripts - Perl, Php, Python, AppleScript- , command line tools included in OSX or installed via MacPorts,etc.
Platypus is quite simple to use and comes with nice and helpful documentation.
If you like it, you can support the project with a donation. My Posterous: http://yildizoglu.posterous.com
Sunday, January 23, 2011
A nice tool for presenting dynamic data for teaching: Gapminder

This time I will write on my first impression about a gorgeous teaching tool that I have discovered thanks to a TED video by Hans Rosling: Gapminder.
Gapminder is a web site that allows dynamic presentation of many interesting time series (economic indicators, demographics, education, technology). It is also possible to download an off-line version made with Adobe Air.
It is very straightforward to use (just click to select the data to show on both axes, for the size of the bubbles and the categorization (geographic regions, countries, etc.) for the coloring of the points. You can animate the evolution of the variables in time and show very lively graphs to your students.
In my courses on economic growth, I generally confront theories with empirics and this tool will give me much better speaking graphs.
Unfortunately, there is no way to include your data in the tool and the real utility of it will finally depend on the data sets you need. But GapMinder web site is kind enough to show how to animate your data using Google Motion Chart. I was not aware of the existence of this tool...
Tuesday, December 14, 2010
LyX 2.0.0 beta 2 released
LyX 2.0.0 beta 2 released
The second beta version of LyX 2.0.0 has been released.
News provided by

The second beta version of LyX 2.0.0 has been released. Testers of the first beta are encouraged to test the new version.
The current stable release for any serious work remains 1.6.
For a list of new features have a look at a previous blog post or visit
- the List of new features and changes,
- the LyX Homepage,
- the announcement of the 2nd beta on the mailing list,
- the 2nd beta on the FTP server.
This text is available in German. Dieser Text ist auch in Deutsch verfügbar.
LaTeX
LaTeX Community News 10 décembre 2010 16:24 by mailrobot@latex-community.org (Stefan_K) LyX 2.0.0 beta 2 released The second beta version of LyX 2.0.0 has been released. News provided by The second beta version of LyX 2.0.0 has been released. Testers of the first beta ar ... http://yildizoglu.posterous.com/lyx-200-beta-2-released My Posterous: http://yildizoglu.posterous.com {{hash_tags}}Tuesday, August 10, 2010
Compiling Ipe 6.0pre32 on Mac OS X 10.6 (Snow
Using these instructions proposed by Sherif Ghali on the ipe mailing list, I have been able to compile it for OSX 1.6.4. Thanks a lot Sherif!
You can read Sherif’s instructions on the IPE mailing list archives.
You can read Sherif’s instructions on the IPE mailing list archives.
Installing Dictionnaire de de l'Académie Française in the OSX Dictionary application
You can download from this link a zip file that contains a packager for this dictionary. Thanks a lot to Etresoft! Unzip the archive and double-click on the « Dictionnaire-AcademieFrancaise_1935.pkg » file. After installation, open the Dictionary application and activate this dictionary in the preferences. Voilà!
Thanks to MacOSXHints for this tip!
Thanks to MacOSXHints for this tip!
Saturday, July 31, 2010
Replacing PowerPro for Windows with OSX tools
As I have written in my initial switching post, one of the softs that i am missing under OSX is the magical PowerPro (PP) program for Windows. PowerPro is a very small program but it is a real Swiss Army Knife with a very rich set of functionalities (I am sure that during all years I have used it, I have not been able to discover all of them!). I have first find Butler to replace PowerPro for some of the facilities, but inserting text templates (like different greetings in mails or small LateX snippets) was rather painful. First open the shortcuts screen of Butler, then type the alias for the snippet, then type return, etc. Under PowerPro, I could just type ;prop and PP would replace it with
\begin{proposition}
\end{proposition}
I was used to have at mys disposition a whole set of such snippets for different softs, and was missing them under OSX.
Enter KeyBoard Maestro (KM)! It is definitely not as powerful as PowerPro, but it brings the exact function that I was missing. I can now type ;prop and get the corresponding snippet. Or type CTRL+F and activate the French spelling dictionary in FireFox (combining the very nice Quick Locale Switcher plugin with Keyboard Maestro). KM can do many other tricks (launching programs, resizing their windows, opening some default document by simulating clicks on menu items, etc.). It is not free, but it is not unaffordable either.
You can check its features from this page and, if you are convinced by its possibilities, you can order it from this page.
Living with the reflective screen of the MacBook Pro
My switch to Mac is now complete and I very rarely start Parallels Windows 7 VM. One of the major difficulties I have met with the MBPro is the eye (and brain) strain caused by the very reflective screen of this laptop, when I work outside, under high sun light. Apple indeed does not propose a matte option for the MBPro 13’. Since I have used anti-reflective filters for my PDAs, I knew that such a solution exists. After having done some research on the Net, I have ordered a Nushield DayVue Screen Protector that I have received today.
Installing the filter has been quite a hassle, as its is always the case with this kind of protections. The important point is to install it without capturing any dust between the filter and the screen. I have spent some time to clean the screen of the laptop. I had to admit that I would not be able to eliminate all traces from the glass, since at least one of them has completely resisted all my rubbing efforts. Since it was a very small bump point, I have decide to install the filter anyway. You must be very careful not to capture supplementary dust during the installation. Consequently, you need a dust free environment. Doing the installation in the bathroom, after a hot shower is the trick, since the humidity captures dust particles. With the help of my daughter (installing a 13’ filter is a little bit more complex than a 3’ filter I have used for my PDAs!), we have been able to make quite a nice installation, without many particles and bubbles. When I have finished pushing all bubbles to the borders of the filter, using a credit card, I was ready to test my new screen in the garden:
Installing the filter has been quite a hassle, as its is always the case with this kind of protections. The important point is to install it without capturing any dust between the filter and the screen. I have spent some time to clean the screen of the laptop. I had to admit that I would not be able to eliminate all traces from the glass, since at least one of them has completely resisted all my rubbing efforts. Since it was a very small bump point, I have decide to install the filter anyway. You must be very careful not to capture supplementary dust during the installation. Consequently, you need a dust free environment. Doing the installation in the bathroom, after a hot shower is the trick, since the humidity captures dust particles. With the help of my daughter (installing a 13’ filter is a little bit more complex than a 3’ filter I have used for my PDAs!), we have been able to make quite a nice installation, without many particles and bubbles. When I have finished pushing all bubbles to the borders of the filter, using a credit card, I was ready to test my new screen in the garden:
- Anti-reflection works really! I continue to see some reflective light on the screen, but it is much less disturbing. The result was quite impressive indeed.
- The filter does not reduce much the light emitted by the screen. I have read for other filters that their users were complaining about the necessity of using the screen with maximal brightness. I have not observed such a negative effect.
- The filter does not introduce any distortion in the screen. In fact, I am totally unable to see it on the screen (except in on the very small dust point that I have not been able to eliminate from my screen).
- My experience with this filter is very satisfactory until now. If I observe new problems, I will edit this post to share them with you.
Tuesday, April 27, 2010
Switching to Mac OSX (Snow Leopard)
I am starting to migrate to Mac OSX my working environment. I am an old Linux user for my servers but I have never been completely convinced by the Desktops for Linux (mainly KDE and Gnome) and gone back to Windows with the introduction of its first usable version (XP). I have deliberately missed the Vista wagon, and have not been impressed by Windows 7. Being tired by the quirks of XP, I wanted to adopt a more reliable and modern interface. OSX seems to me to comply with this demand, and the Unix that is behind the interface is quite a standard one, quite easy to understand for a person used to Linux. I am a happy camper concerning the very well thought interface of OSX.
Migrating my working environment to OSX has not been completely simple. Before the switch, I have, of course, checked that this migration is broadly possible. Here I indicate what was very simple, what was more bumpy, and the points for which I have not yet found a completely satisfactory solution.
Immediate transition for:
- Internet tools, starting with Firefox (I really need it for Zotero and other tools that do not exist under Safari or Chrome);
- Latex compilation, just install TexLive, it is perfect.
- For many aspects of Tex on OSX, check the wiki
- Simple Latex editors: TexMaker is a very nice multi-platform editor. Aquamacs (Xemacs with an Aqua interface) comes standard with AUCTex, which a very powerful Tex editing and compiling tool.
- Graphical Latex editors: I was using Lyx under Windows, there is an OSX version.
- Mendeley Desktop (very nice, bibtex compatible library manager) has an OSX version.
- Statistical tools: R-project offers an OSX version, perfect for me; it was my main tool under Windows. I am using Aquamacs also for R, since it comes with ESS (Emacs speaks statistics), which is also very powerful. Gretl (econometrics) works under OSX.
- Java programming: Eclipse works under OSX.
- NetLogo works under OSX.
- Bitmap graphics: Gimp also offers an OSX version.
- Vectorial graphics: JPicEDT is written in Java, so you can use it also under OSX, without any problem
- MS Office: I am using Office 2008.
- Picasa has an OSX version (I prefer it to iPhoto, probably because I am too lazy to replace an old software that satisfies me).
- Skype has on OSX version.
- Evernote works nicely with OSX.
- Freemind mind map software also works under OSX (Java).
- Zipeg is a nice and free zip archive manager.
- One difficult point has been to find a nice substitute to PowerPro (this very nifty and talented swiss-army knife utility for managing many aspects of windows and automatizing many tasks). Butler is able to replace some of them. I am learning AppleScript for some other aspects. Don't call this an easy transition ;-)
- Lyx has problems to import some big Latex files I have written with Scientific Word, so I continue to use the latter under a Parallel's virtual machine :-( I would really have an OSX version of SWP, even if I love Lyx...
- Unfortunately Entourage in Office 2008 is not compatible with Outlook (such a stupid strategy!); I am waiting Office 2010 that will reintroduce Outlook. I like quite well Apple-Mail but my several years old mail archive is under Outlook format and I do not want to loose mails during the conversion process...
- Making Inkscape + TexText work under OSX has been a pain. I do not even remember how I have been able to do it (I have followed and mixed several forum post on this topic).
- Ipe graphics editor for Latex does not propose an OSX version out of the box. It seems possible to compile it for OSX, but I have not had yet the time to do it (it seems a little bit painful).
- Xara X drawing software for vector graphics. I am really missing this one. I had to install it in the virtual machine.
- Bibliography management for bibtex: I like Jabref (it is multi-platform), but Bibdesk is a very nice reference management tool.
- Backup: Time machine is very nice and you have also nice imaging tools under OSX. You can use TimeMachineEditor to customize some of its aspects. Backblaze also works for OSX and I have been able to transfer my subscription to the new machine without any problem (be just ready to loose all your old Windows backups).
- The Agenda of OSX is very nice and simply synchronizes with Google calendar.
- Bean is a very nice and light Word file editor.
- Skim is a very useful free Acrobat viewer (and editor). Preview in OSX also very useful (deleting pages, etc.). FormulatePro allows the filling of Acrobat forms.
- MyMind is a very nice idea editor.
- WineBottler (free) is a very nice Wine version that allows the installation of some small Windows programs under OSX. I have tested CrossOverX, but have not really been convinced by its advantages.
- OSX comes with many small and nice utilities (managing hard disk, writing DVDs, etc.).
Thursday, September 10, 2009
Sumatra: Quick PDF viewer for Windows

If you use pdfLaTeX under Windows, you are maybe tired of waiting Acrobat reader to open, each time you compile your document and want to check the preview. I like Acrobat for its professional features but I rarely need them. For all other occasions where I just want to quickly check a PDF file, Acrobat is just a pain to launch.
I have tested FoxReader in the past but I was not fullt happy with it. I think that I have now found the perfect quick PDF reader, thanks to a post in the Lyx's users-forum: Sumatra PDF Reader. It has even a full screen mode that works quite well (even Acrobat's better fills the screen). It gets along quite well with any LaTeX editor (Lyx, TexMaker, Scientific Word, etc.).
It is also quite easy to drive using keyboard shortcuts, as you can learn this in the "manual".
Friday, June 19, 2009
A very nice and free text editor: Notepad++

You can edit source code in many languages, benefitting from syntax highlighting and auto-insertion of the main commands.
It places itself in the context menu of the explorer, for facilitating the quick opening of any text files from a right click in the explorer. It is difficult to exhaustively indicate all its functions.
It is based on the Scintilla platform; it is both very easy to use and very powerful.
Here are the features of Notepad++, as indicated on the web site:
- Syntax Highlighting and Syntax Folding
- WYSIWYG
- User Defined Syntax Highlighting
- Auto-completion
- Multi-Document
- Multi-View
- Regular Expression Search/Replace supported
- Full Drag 'N' Drop supported
- Dynamic position of Views
- File Status Auto-detection
- Zoom in and zoom out
- Multi-Language environment supported
- Bookmark
- Brace and Indent guideline Highlighting
- Macro recording and playback
Wednesday, February 25, 2009
ChkTex with LyX and Miktex 2.7 under Windows XP
ChkTeX is a LaTeX utility for... checking your Latex syntax. It is maintained by Baruch Even.
LyX can use ChkTex utility. But Miktex does not come with this utility.
I propose here a way to activate this functionality using the chktex binary that is distributed in the TeXLive LaTeX system. This is quite simple indeed.
I assume that you have installed Miktex in the "C:\MiKTeX2.7" folder.
First download the chkTexFiles.zip archive from my web server. It contains the necessary files for the installation of chktex under Miktex.
This archive contains the following files:
The other four files are the executable for chktex and the necessary libraries. You must put them in the folder C:\MiKTeX2.7\miktex\bin.
You must now tell LyX how to find these files.
You activate "Tools/Preferences" menu item in LyX, and in the Output/Latex item in the left menu, you must give the following command for ChkTex:
ChkTeX.exe -l "C:\MiKTeX 2.7\tex\chktex\.chktexrc" -n1 -n3 -n6 -n9 -n22 -n25 -n30 -n38
I must admit that I have not dug all the options for ChkTeX, you can probably finetune them using the ChkTeX documentation but these default options work on my installation. If you execute chktex -h in a Dos box, you will get an output that will indicate the role of different options.
Once you save the configuration (do not forget to click on the Save button in the preferences box ;-) ), you can execute "Tools/Check Tex" menu item and it will indicate the potential problems with your LaTeX file. Don't be afraid by the results! :-)
ChkTeX source files are also available from CTAN.
LyX can use ChkTex utility. But Miktex does not come with this utility.
I propose here a way to activate this functionality using the chktex binary that is distributed in the TeXLive LaTeX system. This is quite simple indeed.
I assume that you have installed Miktex in the "C:\MiKTeX2.7" folder.
First download the chkTexFiles.zip archive from my web server. It contains the necessary files for the installation of chktex under Miktex.
This archive contains the following files:
- .chktexrc
- ChkTeX.exe
- tl90geturl.dll
- tl90gnu.dll
- tl90kpse.dll
The other four files are the executable for chktex and the necessary libraries. You must put them in the folder C:\MiKTeX2.7\miktex\bin.
You must now tell LyX how to find these files.
You activate "Tools/Preferences" menu item in LyX, and in the Output/Latex item in the left menu, you must give the following command for ChkTex:
ChkTeX.exe -l "C:\MiKTeX 2.7\tex\chktex\.chktexrc" -n1 -n3 -n6 -n9 -n22 -n25 -n30 -n38
I must admit that I have not dug all the options for ChkTeX, you can probably finetune them using the ChkTeX documentation but these default options work on my installation. If you execute chktex -h in a Dos box, you will get an output that will indicate the role of different options.
Once you save the configuration (do not forget to click on the Save button in the preferences box ;-) ), you can execute "Tools/Check Tex" menu item and it will indicate the potential problems with your LaTeX file. Don't be afraid by the results! :-)
ChkTeX source files are also available from CTAN.
Sunday, February 15, 2009
Lyx and Sweave under Windows XP
These instructions propose a solution for making Sweave work under Windows XP, using Lyx 1.6.1 and R-project 2.8.x.
Adapted from the instructions provided by Paul Johnson and Cheng-shan (Frank) Liu:
(see http://n2.nabble.com/Converter-failure-with-Sweave-td479669.html)
These instructions correct some small problems that were impeding the original instructions from working under the recent version of R that I use. I also take into account the fact that the default installation folders of R and Lyx are under Program Files, a path that contains a space, and can cause problems.
We will suppose that Lyx 1.6.1 is installed in C:\Program Files\LyX16 and R in C:\Program Files\R\R-2.8.1 (their default folders under Windows).
- Place noweb.sty and sweave.sty (part of the R installation - see the share\texmf subfolder of R, see the next instruction) in a folder that can be find by your Latex installation (under texmf-local for example).
- Copy the content of the C:\Program Files\R\R-2.8.1\share\texmf folder in the previous folder or in another folder under your texmf tree.
- Refresh the file catalogue of Latex (execute mktexlsr for TexLive in a Dos command box, for example). You can now check the placement of these files by executing kpsewhich noweb.sty in a Dos command box.
- Reconfigure Lyx (go to Edit-> Reconfigure). Check if you have document class "article(noweb)" or "article(Sweave noweb)" (in Document-> Settings->Document class). If not, you will need to reinstall Lyx.
- Create a batch script called Rweave.bat and put it in the folder C:\Program Files\Lyx16\bin\. You can create this file using notepad or any other text editor (PSPad is a very nice and free one). The file should contain a one line instruction:
"C:\Program Files\R\R-2.8.1\bin\Rterm" --no-save --args "%1" < "C:/Program Files/LyX16/bin/MakeSweave.R" > "%1.log"
- Create a R file MakeSweave.R with the following lines and put it in C:\Program Files\Lyx16\bin\:
library(tools)
args <- commandArgs() filename <- args[length(args)] Sweave(filename) basename <- sub("\\.(Rnw|Rtex|nw)$", "",filename) texi2dvi(paste(basename, ".tex",sep=""), pdf=TRUE)
- You must now configure in Lyx the converter for noweb files. Go to Edit->Preferences->File Handlers->Converters. In the "From" pulldown, choose Noweb. In the "To" pulldown, choose PDF (pdflatex).In the box called "Converter" type "Rweave $$i" without the quotation marks. If necessary, click the “Modify” button and save the new command.
- You can now test your installation by opening an example file that contains R scraps. For example Paul Johnson's Gamma distribution lyx document.
You can typeset this document using the pdf icon and the resulting file should open in the acrobat viewer you have configured in Lyx.
You should be able to read the results of computations and see the plots.
- Sweave web page
- Lyx Wiki page for Sweave
- Using LyX with Sweave by Gregor Gorjanc
- Complementary instructions by Jeff Laake (if mines are not enough in your case)
Saturday, February 14, 2009
A free and powerful text processor : LyX

LyX is a nearly WSYWIG front end for Latex. It constitutes a very credible open source alternative to my other preferred (commercial and quite expensive) Latex editor (Scientific Word).
I have been following LyX's development for some years, without being fully convinced by its facilities. I consider that it now constitutes a very useful front-end to Latex: it is very stable and it fully interfaces with all the facilities characterizing Latex (typesetting mathematics, bibliography management, cross references, graphics, integrating results of statistical computations using R-Project - thanks to the Sweave interface, etc). It definitely offers today more functionality than Scientific Word (see below).
As a consequence, I do not have any reserve in advising you to test LyX, I think you will love it. Binary versions are available for all plateforms (Windows, Linux, Mac OS X).
Web site
Wiki
Monday, September 08, 2008
A very nice file explorer for Windows: Q-dir
This time I am presenting a tool that is not directly related to the production of documents with LaTeX. Q-dir a very nice and free file manager that I have discovered recently. It manages to be very small and, nevertheless, very flexible and efficient. For me, the main two very nice properties are the possibility of
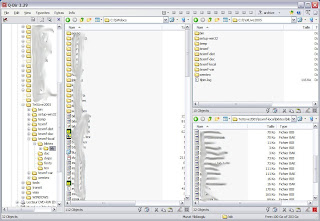 It has of course many other very nice features. You cab also install it on a USB stick.
I invite you to check the website and download it for learning more about the possibilities it offers.
To repeat the slogan of it's creator: "Once Q-Dir, always Q-Dir ;)!"
- opening several folders side by side for intensive files copying;
- saving typical folder configurations as favourites and open them all in the same time by calling the corresponding favourite;
 It has of course many other very nice features. You cab also install it on a USB stick.
I invite you to check the website and download it for learning more about the possibilities it offers.
To repeat the slogan of it's creator: "Once Q-Dir, always Q-Dir ;)!"
Subscribe to:
Posts (Atom)